Are you tired of buying pre-made waffle cones from the grocery store?
Why not try making your own at home? Not only will it save you money, but it’s also a fun activity to do with friends and family.
Maybe it’s a simple method you don’t even expect.
Mix batter, pour on the waffle cone maker, cook, and shape into cones to make ice cream waffle cones. Let cool, fill with ice cream, and enjoy!
First things first, gather all the necessary ingredients and equipment.
You’ll need flour, sugar, salt, eggs, vanilla extract, butter, milk, and a waffle cone maker.
Don’t worry if you don’t have one; a regular griddle or pan can work too!
Once you have everything ready, it’s time to start preparing your batter.
In this article, we’ll guide you through the steps to make delicious ice cream waffle cones that will impress you. So put on some music, and let’s get started!
Gather Your Ingredients And Equipment

Get everything you need and gear up for the ultimate homemade treat.
To make ice cream waffle cones, you’ll need a few basic ingredients such as flour, sugar, salt, eggs, milk, butter, and vanilla extract. You’ll also require special equipment like a waffle cone maker or an electric waffle iron.
If you don’t have these appliances, you can still fashion your cones using a stove-top method and a mold.
Tips for ingredient substitutions include swapping regular flour with gluten-free or almond flour to cater to dietary restrictions.
You can also experiment with sweeteners like honey or maple syrup instead of sugar for a unique flavor profile.
Variations in waffle cone shapes are another fun way to personalize this dessert.
Try rolling them into cylinders or bending them into taco-like shells before they harden for added visual appeal.
Now that you’ve gathered your necessary items, prepare your waffle cone batter!
Prepare Your Waffle Cone Batter

Now that you’ve gathered your ingredients and equipment, it’s time to prepare your waffle cone batter.
You’ll start by mixing the dry ingredients and wet ingredients.
Once your batter is mixed, let it rest for a few minutes to allow the gluten to develop.
While waiting, preheat your waffle cone maker so it’s ready when you are.
Mixing And Resting
You’ll want to mix up the batter until it’s smooth and then let it rest before moving on to the next step.
To mix the batter, combine flour, sugar, salt, vanilla extract, eggs, and milk in a bowl. Whisk all ingredients together until they’re well combined. Be careful not to overmix the batter, resulting in tough waffle cones.
Once your batter is mixed, rest for about 5-10 minutes.
This resting duration allows the flour to absorb moisture from the other ingredients, which helps make a smoother batter.
During this time, you can preheat your waffle cone maker so it’s ready when you’re finished resting your batter.
Preheating Your Waffle Cone Maker
Before diving into the deliciousness, let’s take a moment to preheat that magical machine of crispy goodness until it’s hotter than the sun and ready to transform batter into pure happiness.
Preheating your waffle cone maker is essential to achieve perfect ice cream waffle cones.
Here are some benefits of preheating and common preheating mistakes to avoid:
- Not allowing enough time for the machine to heat up
- Overheating the machine can lead to burnt cones
- Neglecting to clean the plates before use
Benefits of preheating:
- Ensures even cooking
- Improves texture and crispiness
- It prevents the batter from sticking.
- Saves time in the long run
You’ll be rewarded with perfectly shaped and crispy cones that will impress by taking a few extra minutes to preheat your waffle cone maker properly.
Now that your machine is heated and ready, it’s time to shape your waffle cones.
Shaping Your Waffle Cones

Now that your waffle cone batter is ready, it’s time to shape your cones!
First, you’ll need to roll out the dough and cut it into the appropriate size.
Then comes the fun part – shaping the cone!
With a little practice, you can create perfectly shaped cones quickly.
Prepare to impress your friends and family with homemade ice cream waffle cones!
Rolling And Cutting The Dough
As you press down on the dough with the rolling pin, the sweet aroma of freshly baked cones fills your kitchen.
To achieve the perfect thickness, use a cutting technique that involves rolling the dough between two sheets of parchment paper.
This ensures consistency and allows for easy transfer to the waffle cone maker.
The dough should be thin enough to create a crispy texture and thick enough to hold its shape when rolled into a cone.
Once you have achieved the desired thickness, use a sharp knife or pizza cutter to cut out circles from the rolled-out dough.
Use a circular template or mold slightly larger than your waffle cone maker’s form size.
You can then easily lift each circle using an offset spatula and wrap it around the cone-forming tool, shaping it into a perfect cone.
And now that you have your perfectly shaped cones, it’s time to move on to filling them up with delicious ice cream!
Shaping The Cone
To shape your cones, wrap the cut-out circles around the cone-forming tool and press gently until they take on the classic conical shape.
However, different cone-shaping techniques can be used depending on your preference. Here are some examples:
Traditional Cone: This involves wrapping the dough circle around a metal or wooden cone and pinching the seam together at the bottom.
Flat Bottom Cone: This technique involves taking a small piece of dough and pressing it onto the bottom of the cone before wrapping it with a larger circle to create a flat base.
Rolled Waffle Cone: This method involves rolling up the dough circle into a tube shape before placing it onto a heated waffle iron to cook.
Once you have shaped your cones, it’s time to get creative with decorating waffle cones!
Sprinkles, chocolate chips, chopped nuts, and drizzled chocolate are just some options for adding pizzazz to your ice cream treat.
As you finish shaping your cones, it’s time to move on to cooking them to achieve that perfect crispiness.
Cooking Your Waffle Cones

Prepare to indulge in your homemade dessert vessel’s crispy, golden goodness by carefully cooking your delectable waffle cones.
Preheat your waffle cone maker according to the manufacturer’s instructions.
While the iron’s heating up, mix your batter with flour, sugar, eggs, vanilla extract, and milk until it’s smooth and free from lumps.
When your waffle cone maker is heated up and ready to go, use approximately 1/4 cup of batter for each cone and pour it onto the center of the hot iron. Close the lid and cook for 1-2 minutes or until golden brown.
Be sure not to overcook, which can lead to a burnt taste!
Once cooked, immediately use a spatula or tongs to remove the hot waffle cone from the maker and wrap it around a cone-shaped mold while still warm.
This will help to shape it before it begins cooling down.
With these simple tips, you can easily avoid common mistakes when making waffle cones, such as undercooking or burning them.
Now that you have perfectly cooked waffle cones wrapped around their molds and waiting to cool down completely into their signature crispiness, let’s focus on removing them from their molds without breaking off any pieces!
Removing Your Waffle Cones
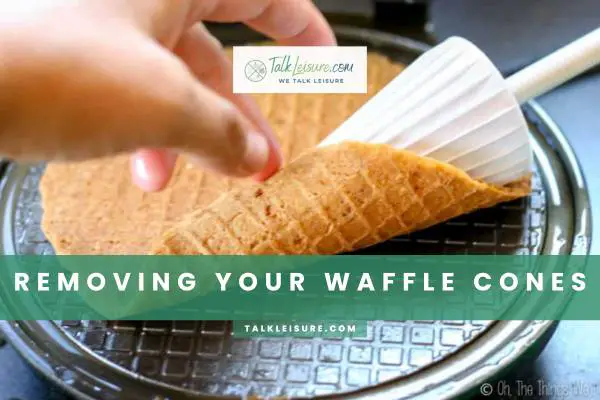
Ready to unveil your crispy homemade dessert vessels?
Discover the secret to removing them from their molds without any breakage!
The most effective way of ensuring that your cones come out perfectly every time is using tools to remove waffle cones.
Here are some tips for avoiding cone breakage:
- Let the waffle cones cool down completely before removing them from their molds. This will prevent them from being too soft and breaking apart when you try to take them off.
- Use a small offset spatula or butter knife to loosen the waffle cone’s edges gently. Work your way around the mold, loosening each section until it is entirely separated from its mold.
Carefully slide a long, thin object like a chopstick or skewer between the cone and the mold’s base. Gently lift it by applying slight pressure on both sides of the mold.
If you’re having difficulty getting your waffle cones out of their molds, try placing them back in the oven for another minute or two. This will help loosen up any sticky spots and make removal easier.
Now that you’ve successfully removed your waffle cones from their molds, it’s time to roll them into shape!
Rolling Your Waffle Cones
Now that you’ve removed your freshly made waffle cones from the iron, it’s time to roll them into shape.
Using a rolling pin, gently flatten the edges of the cone while keeping the tip pointed.
Slowly wrap the flattened cone around a cylindrical object, such as a wooden dowel or an ice cream scoop handle, and hold for a few seconds until it cools and hardens into its classic cone shape.
Using A Rolling Pin
Roll out the dough with a rolling pin until it’s thin and smooth.
Then, gently lift it onto the cone-shaped mold. This is a great option for those who prefer using a rolling pin over other techniques.
Using a rolling pin gives you more control over the thickness of your waffle cones.
Here are some tips on how to use a rolling pin when making ice cream waffle cones:
- Place the dough between two sheets of parchment paper and roll it out with a rolling pin.
- Roll evenly in all directions to avoid any lumps or bumps in your cone.
- Keep the dough as thin as possible without tearing it.
After you’ve rolled out the dough, carefully lift it onto the cone-shaped mold and start shaping it into a cone.
Shaping can be tricky, but don’t worry; we’ll cover that in the next section!
Shaping the Cone
To achieve the perfect shape for your homemade cones, you’ll want to carefully mold the thin dough onto the cone-shaped mold while being mindful of its fragility. Start by placing a small amount of dough on the bottom of the mold and gently pressing it around the base.
Slowly work your way up, adding more dough as needed and using your fingers to press it against the sides of the mold.
Once you’ve covered most of the surface area, use cone shaping techniques like folding and twisting to create a seamless seam down one side of the cone.
If you’re feeling creative, try experimenting with decorative cone designs by lightly pressing a fork into the surface before baking or dipping them in melted chocolate for an extra treat.
Once shaped, bake according to recipe instructions and allow them to cool completely before removing from the molds.
Now that you have perfectly shaped waffle cones let’s move on to how to store them properly without compromising their delicate texture.
Storing Your Waffle Cones

When storing your freshly made cones, you must ensure they are completely cooled and place them in an airtight container.
This will help prevent moisture from getting into the cones and causing them to become soft and soggy.
If you don’t have an airtight container, you can also wrap each cone individually in plastic wrap. Another tip for storing freshly made waffle cones is to keep them away from heat and humidity.
This means avoiding placing them near windows or other sources of direct sunlight and keeping them in a cool, dry place.
By following these simple tips, you can ensure that your waffle cones stay crispy and delicious for days after making them.
Now that your waffle cones are safely stored away, it’s time to serve them with some tasty ice cream!
Serving Your Waffle Cones

Now that you’ve made your delicious waffle cones, it’s time to add some ice cream and toppings!
Start by scooping your favorite flavor of ice cream into the cone. You can also add a variety of toppings like sprinkles, hot fudge, or whipped cream for an extra treat.
Once everything is added, take a bite and enjoy your sweet and crispy creation!
Adding Ice Cream And Toppings
As you scoop the creamy, cold treat into your freshly baked and crispy cone, don’t forget to add a delightful array of toppings to complete the indulgent experience.
Start with some of the best toppings complementing your unique ice cream flavors.
For example, add chopped nuts or chocolate chips if you have a rich chocolate flavor.
If you prefer something fruity like strawberry ice cream, add fresh berries or whipped cream for sweetness.
But don’t stop there! Get creative with your toppings and mix and match different flavors to create something unique.
Try drizzling caramel or fudge sauce over your ice cream before adding sprinkles or crushed cookies on top for an extra crunch.
The possibilities are endless for topping off your waffle cone masterpiece!
Now that you’ve added all your favorite toppings, it’s time to enjoy your delicious treat! Take a bite out of the crunchy waffle cone and savor every moment as the ice cream melts in your mouth.
Nothing beats the satisfaction of making and enjoying homemade ice cream waffle cones, whether it’s a hot summer day or just a craving for something sweet.
Enjoying Your Delicious Treat
Indulge in the ultimate sweet treat as you sink your teeth into a crispy, golden cone filled with creamy goodness and an explosion of toppings that will leave your taste buds dancing like fireworks on the Fourth of July.
Presentation is key when enjoying your ice cream waffle cone.
Hold it firmly at the bottom while taking small bites from the top to prevent drips or spills.
Pairing suggestions can take this delicious treat to the next level.
Enjoy your cone alongside a cold glass of milk or a warm cup of coffee for a truly satisfying experience.
If you’re feeling adventurous, try pairing different flavors of ice cream with contrasting toppings, such as fruity pebbles on top of chocolate ice cream or caramel sauce drizzled over vanilla bean.
As you finish your last bite, let yourself savor the moment and reflect on how easy it was to make this tasty treat.
Now that you’ve mastered the basics, why not experiment with flavors and variations?
Experimenting With Flavors And Variations

Exploring different tastes and combinations is key to discovering the perfect flavor profile for your homemade dessert cones.
Once you’ve mastered the basic recipe, it’s time to experiment with your ingredients and toppings.
Here are a few ideas to get you started:
- Mix things up by incorporating unexpected flavors into your cone batter. For example, add a sprinkle of cinnamon to your waffle mix or mix in some berry puree for a fruity twist.
- Don’t be afraid to think outside the box when topping off your cones. Instead of traditional sprinkles, try using chopped nuts or crushed candy bars. You can also add texture by drizzling melted chocolate over the top or rolling the edges in shredded coconut.
With these simple ideas, you can transform a classic ice cream cone into a unique and flavorful dessert that will impress any guest.
So experiment with different flavors and toppings until you find the perfect combination that suits your taste buds!
Conclusion
Congratulations, you’ve successfully made your ice cream waffle cones!
But don’t stop there why not take it to the next level? You could experiment with different flavors and variations of the batter, such as adding cocoa powder for a chocolatey twist or using almond extract instead of vanilla.
Get creative with your toppings, too – try dipping your cones in melted chocolate and sprinkling them with crushed nuts or candy. And let’s not forget about the presentation.
Serve your waffle cones with fresh fruit and whipped cream on a colorful platter.
Don’t be afraid to go all out – after all, you work hard to make these delicious treats from scratch.
Your friends and family will be impressed by your culinary skills, and you’ll feel proud knowing that you created something truly special.
So go ahead, indulge in that sweet satisfaction – you deserve it!
Frequently Asked Questions
How Long Does It Take For The Waffle Cone Batter To Set Before Shaping?
The waffle cone batter typically takes 2-5 minutes to set before you can start shaping it.
You’ll know it’s ready when the batter becomes thicker and less runny.
This allows you to shape it into a cone or any desired shape easily.
Be sure to follow your specific recipe for the best results, as the exact time may vary slightly depending on the batter’s ingredients and consistency.
Can I Use A Different Type Of Flour In The Waffle Cone Batter?
Are you looking for alternative flours to use in your waffle cone batter? You’re in luck!
Yes, you can use a different type of flour in the waffle cone batter.
You can use whole wheat, gluten-free, or even almond flour to make waffle cones.
Remember that different flours may slightly alter the taste and texture, so it’s a good idea to experiment to find the flavor and consistency you like best.
How Do I Prevent My Waffle Cones From Getting Soggy?
To prevent your waffle cones from getting soggy, storing them properly is important.
The best way to do this is by placing them in an airtight container or ziplock bag.
First, place a small piece of chocolate at the bottom of the cone before scooping in your ice cream – this creates a seal to prevent moisture from seeping in.
Next, start with a scoop of soft ice cream at the bottom of the cone; this acts as a protective barrier.
Remember to promptly serve your ice cream-filled cones to enjoy them at their crispiest.
Lastly, consider using a small piece of wax paper or a napkin at the cone’s base to absorb any excess moisture.
These steps will help you savor your waffle cones without worrying about them getting soggy!
Can I Use A Waffle Cone Maker Instead Of Shaping The Cones By Hand?
Yes, you can use a waffle cone maker instead of shaping cones by hand.
A waffle cone maker is designed to make perfectly shaped cones with less effort. Just pour the batter into the maker, close it, and wait for the cone to cook.
It’s faster and easier than shaping them manually, giving you consistent results every time. Enjoy your homemade waffle cones!
How Do I Adjust The Recipe For High Altitude Baking?
To adjust a recipe for high-altitude baking, you need to reduce the leavening agents (like baking powder/soda), increase liquids (like water or milk), and slightly lower the oven temperature.
Start by reducing the baking powder in the recipe by 1/8 to 1/4 teaspoon per teaspoon.
Increase liquids by 1 to 2 tablespoons per cup. Lower the oven temperature by 15-25°F (8-14°C). You may need some trial and error, as adjustments can vary depending on altitude.
Waffle Cone!