
Do you remember the excitement of getting an ice cream cone as a child?
The anticipation of choosing your favorite flavor and then eagerly waiting for that first lick, trying to avoid it dripping down your hand.
Now, imagine elevating that experience by making your waffle cones at home.
With just a few simple ingredients and a waffle cone maker, you can create deliciously crispy and flavorful cones that will take your ice cream game to the next level.
For a homemade waffle cone, you can prepare the batter and bake it easily with a waffle iron.
Making waffle cones may seem daunting, but with this step-by-step guide, you’ll be whipping up batches in no time.
You’ll learn to preheat your waffle cone maker, mix the perfect batter, cook the cones to perfection, and even create unique flavors.
Whether you prefer classic vanilla or something more adventurous like chocolate chip or cinnamon sugar, homemade waffle cones will impress friends and family alike.
So grab some ice cream (and maybe some sprinkles), and let’s get started on our sweet journey of making homemade waffle cones.
Gather Your Ingredients And Tools To Make Waffle Cones
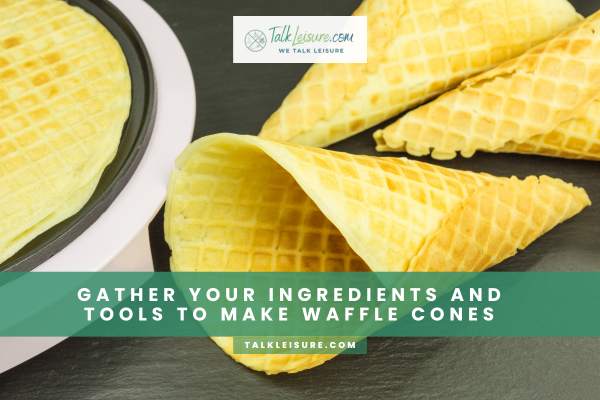
You’ll need some yummy ingredients and tools to create the perfect vessel for your ice cream dreams.
You’ll need all-purpose flour, sugar, salt, eggs, unsalted butter, vanilla extract, and a waffle cone maker.
For ingredient substitutions, you can use almond or coconut flour instead of all-purpose flour for a gluten-free option. You can also substitute coconut oil for the unsalted butter if you prefer.
If you don’t have a waffle cone maker at home, there are alternative methods to making waffle cones without one.
You can use a pizzelle maker or make them in the oven using a baking sheet and parchment paper.
But if you’re serious about making the best homemade waffle cones, investing in a quality waffle cone maker is worth it.
Now that your ingredients and tools are ready move on to preheating your waffle cone maker.
Preheat Your Waffle Cone Maker Waffle Iron
Preheat your waffle cone maker so you can start making delicious treats! Here’s what you need to know:
- Read the manufacturer’s instructions for your specific model, as preheating times and temperature settings may vary. Generally, most waffle cone makers should be preheated for 5-10 minutes at around 375°F.
- Before heating your waffle cone maker, ensure it’s clean and free of any residue from previous use. Use a damp cloth or paper towel to wipe down the cooking plates, and avoid using harsh chemicals or abrasive sponges that could damage the non-stick surface.
Once your waffle cone maker is preheated, it’s time to mix up your batter and start making some delicious homemade cones!
Why You Need A Waffle Cone Maker To Make The Waffle

If you love ice cream, then you need a waffle cone maker.
This handy appliance lets you easily make crispy and delicious small waffle bowls in just 2 minutes.
All you need is a medium bowl and a cone mold to shape the waffle into the perfect cone shape.
Twist the waffle around the cone mold to turn the waffle into a cone.
Find the best cone iron for a delicious butter-crisp waffle cone.
Making waffle cones from scratch is fun and allows you to customize them with various flavors and toppings.
Say goodbye to store-bought cones and make this recipe with an electric waffle cone maker for a truly homemade ice cream experience.
Mix Your Waffle Cone Batter
Now it’s time to whip up your batter and create the perfect crispy, golden-brown treats for you and your loved ones!
Begin by gathering your ingredients: flour, sugar, salt, eggs, milk, vanilla extract, and melted butter.
Whisk together the dry ingredients in a large bowl before adding the wet ingredients one at a time.
Mix until all the lumps are gone, and you have a smooth batter.
Once your batter is complete, it’s time to get creative with customizing toppings and experimenting with fillings.
Some popular options include adding chocolate chips or chopped nuts to the batter before cooking or drizzling melted chocolate over finished cones.
For added flavor, you can also try filling your waffle cones with ice cream or fruit.
The possibilities are endless!
Now that you have your batter ready and some ideas for customizing your cones, let’s move on to cooking them in our next section about ‘cook your waffle cones.’
Cook Your Waffle Cones – Shape The Waffle

Start by sizzling your batter on the stovetop to create scrumptious, crispy cones that will satisfy your sweet tooth.
Heat your waffle cone maker and ensure it’s well-oiled before pouring a small amount of batter onto the center of the bottom plate.
Close the lid and cook for about 30 seconds or until the steam stops escaping from the sides. Open it up and use a spatula to remove the golden-brown waffle cone from the plate.
Balancing crispy and soft is the key to achieving that perfect waffle cone texture.
You want your cone to be crisp enough to hold its shape without being too hard while still having a slight chewiness that complements your ice cream filling.
Repeat this process with each scoop of batter until you have made as many cones as you desire.
Now that you’ve mastered cooking waffle cones let’s create unique flavors that’ll take your dessert game to another level!
Create Unique Waffle Cone Flavors
Discover how to take your dessert to the next level with unique and delicious flavors for your waffle cone.
Don’t settle for plain vanilla or chocolate when you can create flavor combinations that impress your friends and family.
Add mix-ins to your batter, such as crushed cookies, sprinkles, or fruit purees.
Or add extracts like almond or peppermint for a twist on traditional flavors. Once you have your base flavor, it’s time to get creative with toppings!
Consider adding a drizzle of caramel or hot fudge sauce, chopped nuts, or even pieces of candy bars.
Try topping your waffle cone with bacon crumbles and maple syrup for a savory option.
The possibilities are endless for creating unique and tasty waffle cone flavors that will surely delight everyone who tries them.
When all of your cones are made and decorated, storing them properly is important so they stay fresh until serving dessert.
Keep them in an airtight container at room temperature for up to 3 days, or freeze them if you need them later.
With these tips, you can whip up amazing waffle cones that everyone will love!
Store Your Waffle Cones

To keep your delicious creations fresh and ready to enjoy, you must store them properly using an airtight container at room temperature or by freezing them for later use.
Here are three things to keep in mind when storing your waffle cones:
Shelf life of waffle cones: Waffle cones can last up to two weeks when stored properly in an airtight container at room temperature. However, if you want them to last longer than that, it’s best to freeze them.
Freezing waffle cones: If you freeze them, ensure they are completely cooled. Place the cones in an airtight freezer-safe container or bag and store them for up to three months.
Thawing frozen waffle cones: When it’s time to enjoy them, take them out of the freezer and let them thaw at room temperature for 10-15 minutes before serving.
Now that you know how to store your sweet treats properly, it’s time to move on and learn how to serve them!
Serve Your Waffle Cones – Ice Cream Cone And Waffle Bowl

Serving up your delectable waffle cone creations is the next step to elevating your dessert game and delighting your taste buds.
You’ll need to think creatively about toppings and ice cream pairings to make the most of your homemade waffle cones.
Whether you prefer classic combinations or more unconventional flavors, there are endless possibilities for customizing your waffle cone experience.
Consider adding a drizzle of chocolate sauce or caramel on top of your ice cream to get started with creative toppings.
Crushed nuts, sprinkles, and mini marshmallows add texture and flavor to any waffle cone creation.
Add whipped cream or fresh fruit like strawberries or bananas for a more decadent treat.
When it comes to ice cream pairing ideas, don’t be afraid to mix and match flavors for a truly unique taste experience.
Vanilla pairs well with almost anything, while chocolate lovers might enjoy experimenting with mint chip or rocky road flavors.
Now that you know how to serve a delicious waffle cone creation, let’s move on to troubleshooting tips in case anything goes wrong.
What Is The Best Homemade Waffle Cone Recipe?
If you’re looking for the best homemade waffle cone recipe, look no further!
You’ll need a cone form or a waffle maker to make these deliciously crispy cones.
Start by whisking together flour, granulated sugar, and salt. In a separate bowl, beat egg whites until stiff peaks form.
Gently fold the egg whites into the flour mixture, then fold in melted butter.
Heat the cone form or waffle maker, then pour a quarter cup of batter onto each mold.
Cook until golden brown and crisp. Once cooled, fill these homemade waffle cones with your favorite homemade ice cream flavors for a delightful treat!
Troubleshooting Tips
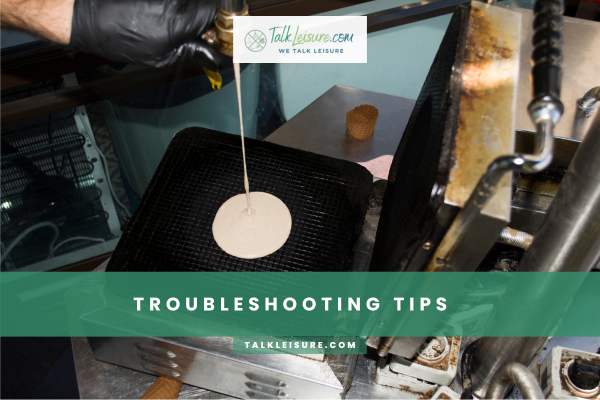
If your dessert dreams start to crumble, fear not!
Making waffle cones can be tricky, but you can solve common issues with these troubleshooting tips.
The cone is too thick: If your cone turns out thicker than desired, try spreading the batter more thinly on the iron next time. You can also try cooking it for a few seconds less than usual to prevent excess thickness.
The cone is too soft or chewy: This could be due to undercooking or leaving the cone in the iron for too long. Adjust your cooking time accordingly and aim for a golden brown color.
Cone breaks easily: Your cone may be too dry or brittle if it’s breaking apart easily. Add a small amount of oil or butter to the batter and thoroughly mix it before pouring it onto the iron.
Waffle cones don’t hold their shape: If you’re having trouble shaping them, they may not have been cooked long enough or cooled down completely before shaping. Make sure they are fully cooled down before attempting to shape them.
With these solutions in mind, you’ll be able to overcome any obstacles during your waffle cone-making process and create perfect cones every time!
In conclusion, making waffle cones takes practice and patience.
Still, with some troubleshooting tips, you’ll soon become an expert at creating deliciously crispy treats that everyone will love.
Conclusion And Final Thoughts
Now that you’ve learned about the common issues you may encounter when making waffle cones, it’s time to wrap things up and put your skills into practice.
With a little patience and practice, you can easily make delicious homemade waffle cones that will impress your friends and family.
When it comes to decorating your waffle cones, the possibilities are endless.
You can dip them in melted chocolate or caramel sauce, sprinkle them with chopped nuts or sprinkles, or even add a scoop of ice cream for an extra treat.
Additionally, you can experiment with different flavorings, such as vanilla extract or cinnamon, to give your cones a unique taste.
Remember to have fun and be creative with your creations
Well, congratulations! You’re now a waffle cone-making expert. Your friends and family will be lining up to taste your delicious creations in no time. Just remind them that this skill didn’t come easy – it takes patience, practice, and a dash of creativity.
But let’s be real here. We all know the true reason you learned how to make waffle cones: so you can enjoy them yourself without having to leave the house. And who can blame you? With endless flavor possibilities and that perfect crunch, it’s no wonder waffle cones have become a beloved dessert staple.
So go ahead and indulge in your newfound talent – just don’t forget to share (or at least pretend like you’ll share).
Frequently Asked Questions
How Do I Clean My Waffle Cone Maker Properly?
When it comes to cleaning your waffle cone maker, there are a few important maintenance tricks to keep in mind.
First, always ensure the machine is unplugged and cooled down completely before cleaning it. Use a soft, damp cloth or sponge to wipe down the plates and remove any excess batter or debris.
You can also use a non-abrasive cleaner or vinegar solution for tougher stains or buildup. Avoid using harsh chemicals or scrubbing too hard, as this can damage the non-stick coating on the plates.
Regularly check for loose screws or parts and tighten them as needed.
By following these cleaning tips and maintenance tricks, you can ensure that your waffle cone maker stays in top condition for many delicious batches of cones!
Can I Make Waffle Cones Without A Waffle Cone Maker?
Ready to indulge in a delectable treat that will leave your taste buds craving more? If you’re eager to enjoy homemade waffle cones but don’t have a maker, fear not!
There are alternative methods for crafting DIY waffle cones that are just as delicious. Using simple ingredients like flour, sugar, eggs, and butter, you can create a batter cooked on a stovetop before being shaped into the classic cone shape.
With a little patience and practice, you’ll soon enjoy perfectly crispy and sweet waffle cones anytime you desire. So grab your apron and get ready to impress with your newfound culinary skills!
How Long Do Waffle Cones Typically Last Before Going Stale?
Waffle cones typically have a shelf life of about 1-2 weeks before they start to go stale.
Storing them properly is important to ensure that your waffle cones last as long as possible.
The best way to do this is by placing them in an airtight container or plastic bag and keeping them at room temperature.
Avoid storing them in the fridge or freezer, as this can cause them to become soggy and lose their crispness.
If you need to store your waffle cones for longer than two weeks, you may want to consider freezing them instead.
Just make sure they are wrapped tightly in plastic wrap or aluminum foil before placing them in the freezer.
When you’re ready to eat them again, let them thaw at room temperature for a few hours before enjoying their sweet, crispy goodness!
Can I Add Food Coloring To My Waffle Cone Batter To Make Colored Cones?
So, you’ve added a little pizzazz to your waffle cones by using food coloring in the batter.
Well, aren’t you just the rebel of the ice cream world?
While it may seem fun, some alternative coloring options might better suit your cone-making needs.
For example, using flavored extracts or cocoa powder can add color without altering the texture or taste of the cone.
But if you must use food coloring, use gel-based colors instead of liquid ones to avoid watering down your batter.
As for shaping your cones, remember to work quickly and use a cone-forming tool or mold for best results.
Don’t forget to let them cool completely before filling them with your favorite ice cream flavors!
What is the best way to store waffle cones to keep them fresh?
To ensure your waffle cones remain fresh and tasty, there are a few storage tips you should follow.
Firstly, storing them in an airtight container or plastic bag at room temperature is best.
This will prevent any moisture from getting in, which can cause the cones to become soggy and lose their crispness.
Also, avoid storing them near heat or light sources, such as direct sunlight or a stove.
Finally, if you need to extend the shelf life of your waffle cones even further, consider freezing them instead.
Just ensure they’re stored in an airtight container or wrapped tightly in plastic before placing them in the freezer.
When ready to eat, thaw them at room temperature for 10-15 minutes before serving.
Following these simple storage tips, you can enjoy deliciously fresh waffle cones for days!
Best Wishes!